Monday, September 12, 2005

Chair!!!

HOLY CRAP - can you believe how freaking awesome this chair looks??

If you're reading this you may or may not know me, but chances are if you know me - you know the story of this chair, but just in case, here's a brief summation of the events.

Aaron & I adopted Sam, an Irish Wolfhound (very sweet dog)
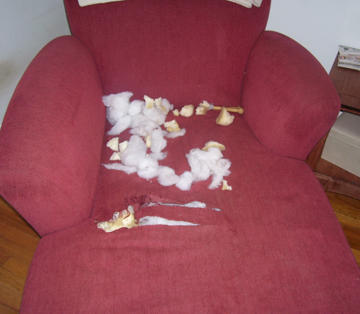
Sam ate the chair - no kidding, huge gaping hole in it - there's a picture below, but the picture does not do that hole justice. I cried and screamed and cussed.

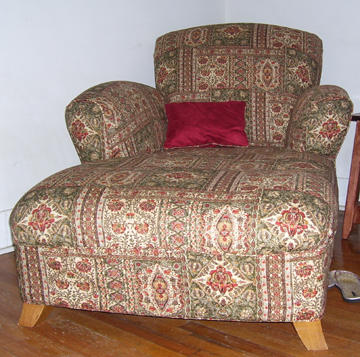
Then, I called my friend Brooke. Now, Brooke is an extremely talented seamstress (to be fair - I don't think seamstress is the best title for what she does - she can design and sew just about anything - she's amazing) and I thought she might be able to tell me if it was possible for me to fix this. She says she'll do it for me. What? Yep, she'll do it for me. One problem - she lives about 6 hours away from me. Hmmm.... I offer to drive the chair to her house. She says no - we'll meet halfway. Then... the most amazing thing happened. She tells a coworker the story and it just so happens that her boyfriend is taking some intense training where I live and drives back and forth every couple of weeks or so. Ok, so two days (yes, two days) after the dog ate the chair, I drive the chair to this generous man's house for him to drive over to my friend Brooke's house. Well, last night - the generous man drove it back and delivered it to my front door! Now, tell me that just didn't work out about as perfect as could be. All I had to do was pick out and buy the fabric (and I must say - now that I see the finished product, I think I did a fine job).

But, without a doubt, the superstar of this story is Brooke. She does do custom work, so if you're interested in hiring her, post a comment and I'll get you in touch with her.

So... without further ado, here's the transformation of the chair.


Swiss Socks

I don't remember where I got this yarn, but these socks remind me of Switzerland. They are warm and cozy - my favorite pair so far!


Baby Vol

This is for a friend of mine who has a shower coming up. I used Excel to chart out the "T" on the hat for the University of Tennessee Vols. To do this, change the row height to 10 and the column width to 1.5 and then fill the cells with color as needed. I used Ann Budd's hat pattern from "The Knitters Handy Book of Patterns" and I used the Class Cashmere Bootees from "Simple Knits for Cherished Babies" by Erika Knight (I love, love, love all of her books!). I plan on making something similar for the other people I know who are preggers (whew - and there are quite a few!).

Wednesday, July 27, 2005

Yummy Shrug

I made this using KnitPicks Andean Treasure in Lagoon. I love, love, love this yarn! It knits up very pretty and feels soooo yummy and for a pretty incredible price too!

I sort of used the free "Staff Shrugs" knitting pattern from Interweave Knits adjusting it for my guage and for a very simple stockinette stitch pattern with a 4 stitch border in seed stitch.


Three Strikes You're Out Socks

I call them that because it took me three tries to make these socks and if I had to pull them out one more time - I was going to give away the yarn. :-P


Tuesday, June 21, 2005

Needle Case

Here's my new needle case that I made.

Case closed:


Case open (flap down)


Case open (flap up)

Chickami Tank

Here's a tank top I made a while back from the www.chicknits.com Chickami pattern. I used some cheapo baby yarn from AC Moore and it is super duper soft.


Friday, April 29, 2005

Vest - Gjestral Naturgarn

I knit this vest using the vest pattern in the knitter's handy book of patterns by Ann Budd and Gjestal Naturgarn in Kelly Green #219 purchased from elann.com.

I used a pattern from knitty.com to guide my choices on the edging.

Here it is:


Felt Flock

I just love this - I used the Fiber Trends Felt Flock pattern and Lambs Pride Worsted in Brown Heather for the body and Onyx for the ears, face and tail.


Coasters

Here are some coasters I knit up a while back. To get the size right, I knit up a swatch larger than I wanted and felted it. Then I scaled back the numbers so I would end up with a 4x4 square. I can't remember the exact counts, but it was something like 30 sts by 17 rows - I worked the stitches in seed stitch. Yarn used: Lambs Pride
in Red Baron and Blue Magic.

Tuesday, April 12, 2005

Legwarmers

Here's my version of the "coming back into fashion" legwarmers. I used Filatura Di Crosa 127 Print in shade 23 - purchased at my favorite knitting store in Charleston, SC -Knit on Charlotte St (downtown). I used size 6 dpns - CO 52 stitches, worked 8 rows in 1x1 rib, then switched to stockinette stitch until I ran out of yarn (I used 3 balls total).

(and please - no comments on the lack of tan - it's only April for crying out loud. :-P)


Close up:

Saturday, April 02, 2005

Lollipop Socks

Here's my third pair of socks (second pair for me). I used Opal Lollipop that came in a 100g ball. Surpringly I only used 50g - each sock is about 25g. I'm guessing this is because they're short socks and it's fingering weight. Anyway - I used a 3x1 rib pattern on the cuff and the top of the foot, otherwise following the Ann Norling #12 pattern (64 stitch).

Here's a picture of the pair:


And here's a close up of the stripes:

Thursday, March 31, 2005

Stepping Out Coat

This is the Stepping Out Coat pattern from Hip To Knit. I rewrote the pattern based on my gauge using the "Gauging a Reaction" section of Stitch 'n Bitch Nation starting on page 13. I used Schoeller Stahl Volare Mouliné, which I purchased from Elann.com. My gauge was 10 1/2 stitches per 4 inches, where the pattern called for 7 stitches per four inches. It was relatively simple to rewrite the pattern, it just took some time and patience. I used some buttons that my good buddy, Larry, sent me a while back for my closures. I did not knit button holes - I just use the open stitches of the ribbed front to poke the buttons through. I'm very pleased with the results - I love the yarn!

Wednesday, March 30, 2005

Wool Dyeing Experiment

I've been really wanting to do more wool dyeing and everyone posts how great the colors come out. So I went to my local Kroger and picked up every color they have of Drink Aid, because I'm a cheap bastard and they were on sale 10 for $1.00 (but they only had 9 flavors, so I doubled one up for good measure). And because I have no idea what color "Tropical Punch" would be (amoung others) I decided to do a little experiment to see what kind of results I would get. Here are my very scientific results. Go ahead and laugh - I know I'm a huge dork.

Steps:
1. Soak 9 pieces of wool 12 inches long in warm water (with a couple of tablespoons of white vinegar)

2. Mix all 9 colors: Mix 1/4 teaspoon (or 1 ml) of Drink Aid to 2 Tablespoons ( or 30 ml) of water. So, that's a 1/30 Drink Aid mixture. All using the same containers (small drink glasses)

3. Add wool to each container

4. Begin microwaving to get wool to soak in color. Here's the tricky part. For larger batches, you can microwave your wool for longer, but because I have so little water, it began to boil very quickly. So, I microwaved each for 30 seconds, then 15 second intervals until done. You will know it's done when the water is milky white (with sugar I'm assuming). See photo (glass on right is done, glass on left is not)


WARNING: microwaves do produce explosive boiling water - this is not a hoax. (see link) however, with wool and all this color in it, it should not be a problem. Regardless - be very careful! The glasses and the water can get very hot, plus you don't want your wool to felt, so take your time.

5. Next, I rinsed each peice of wool with cool water (being careful not to agitate the wool) and blotted dry in a towel, then set out to air dry.

Here is a chart indicating the control number, Drink Aid Flavor, and Total Microwave time


#FlavorTime (seconds)
1Lemon60
2Peach90
3Orange135
4Strawberry150
5Pink Lemon45
6Fruit Punch135
7Raspberry150
8Black Cherry150
9Tropical Punch150
10Raspberry Reaction (Kool-Aid)90
11Wild Watermelon Kiwi (Kool-Aid)120
12Berry Blue (Kool-Aid)120
13Grape150


Here are the resulting colors:


And now with the sample crocheted up into tiny blocks (this seems to represent the color better):


** I did a second batch with some additional colors.


Tuesday, March 22, 2005

Techno Cozy

I wanted a small bag that I could carry my mp3 player, the phone, etc around the house without having to attach it to my belt, or carry it, so this is what I came up with. The yarn was given to me from my friend Ingrid (also the person who taught me to knit - thank you Ingrid!), I dyed the yarn using food coloring. Check out this link to see more information than you could ever need about dyeing yarn using Kool Aid - of course, I couldn't just follow the directions - I had to use food coloring.

Pattern was a smiple 6 stitch cable (one front / left leaning and one back / right leaning). I just sewed up the sides and made a strap using a Clover Wonder Knitter that I picked up from AC Moore.

Classic Cloche

This is from Knit One, Felt Two - Pattern is Classic Cloche, Adult Large, with Lamps Pride, worsted weight, in Black. I have added blocking / felting information at the end.

Pre-felting


Post-felting (on the same table with the same rulers for size reference)


Felting Info:

I used basic felting instructions and a zippered pillow case from my dear friend Sue. I pulled the hat out of the wash after two full cycles (note that I made another hat for a friend, using Paton's Classic Merino Wool and it only took a little more than one cycle of 16 minutes - so, check the hat periodically).

Here's a picture of what the hat looked like when I took it out. My hand is for size reference:


Next, I used a 1.5 Qt mixing bowl to shape the hat - the bowl helps to make sure the hat will be consistently round and smooth all the way around. As you may or may not be able to tell from the picture, the bowl is about 7 inches in diameter.


I put the hat on the bowl and rolled up the edges. I did have to do a bit of pulling on the edge to get it to stretch out a bit. Otherwise it will just go straight down (hey - this may be what you want, but I want mine to flare out a bit):


Next, I left the hat on the bowl until it was dry enough to hold it's shape (a few hours). Then I put the hat on top of a heating vent and let it dry completely. You will want to put the hat on something where it can get some air under it - you can even use a cooling rack, or a rack from your oven. This will help it dry faster and more evenly.

If your hat should happen to end up too small, you can throw it in the sink, rinse it down with some warm/hot water and stretch it out. This may involve putting the hat on your head - so be prepared to ruin any hairstyling you've done. If the hat is too big, you can simply throw it back into the washing machine and let it felt some more. Be sure to check any felting project every minute or so to prevent over felting. Once those items start to felt, the generally do so very quickly.

Sunday, February 27, 2005

Aaron's Socks

I got this yarn for Aaron to make him some socks and figured I would document the progress. He wants a taller sock, so I'm doing a long cuff in 1x1 rib. I'm using Australian Merinos wool and will be reinforcing the heel and toe using Woolly Nylon. I'm using size 4 dpns (48 stitch sock pattern)


Here is the finished pair:


And here is a close up of the toe (note that I forgot, yes forgot, to add the reinforcing thread on the toe, notice that I did in on the heal - DUH!)

Thursday, February 24, 2005

Poncho

Here's a poncho I made back in January. It's made from Bernat denim style (faded kahki is the color I believe) and knit on size 10.5 needles. I just knit two rectangles and then stitched them together (like most poncho patterns call for), then added the fringe. The fringe helps keep the stockinette stitch from rolling up.


                         ^ that's my dog - too curious to stay out of the picture.

Tuesday, February 22, 2005

Oscar

I made this bear a couple of years ago for a friends daughter. The pattern is based on Mr. Bean's favorite teddy. Here is the link to the free pattern:
http://www.knitting-and.com/knitting/patterns/toys/beanbear.htm

Monday, February 21, 2005

First pair of socks

I just finished my first pair of socks and I'm totally excited! Here's some pics to show the progression. I used Regia # 5269, Size 3 dpns, and the Ann Norling #12 Adult Basic sock pattern.