Thursday, March 31, 2005
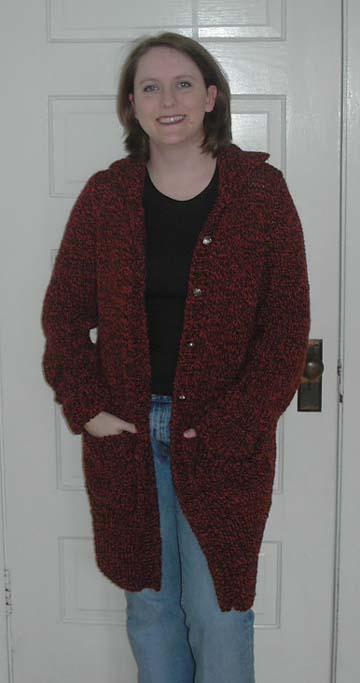
Stepping Out Coat
This is the Stepping Out Coat pattern from Hip To Knit. I rewrote the pattern based on my gauge using the "Gauging a Reaction" section of Stitch 'n Bitch Nation starting on page 13. I used Schoeller Stahl Volare Mouliné, which I purchased from Elann.com. My gauge was 10 1/2 stitches per 4 inches, where the pattern called for 7 stitches per four inches. It was relatively simple to rewrite the pattern, it just took some time and patience. I used some buttons that my good buddy, Larry, sent me a while back for my closures. I did not knit button holes - I just use the open stitches of the ribbed front to poke the buttons through. I'm very pleased with the results - I love the yarn!
Wednesday, March 30, 2005
Wool Dyeing Experiment
I've been really wanting to do more wool dyeing and everyone posts how great the colors come out. So I went to my local Kroger and picked up every color they have of Drink Aid, because I'm a cheap bastard and they were on sale 10 for $1.00 (but they only had 9 flavors, so I doubled one up for good measure). And because I have no idea what color "Tropical Punch" would be (amoung others) I decided to do a little experiment to see what kind of results I would get. Here are my very scientific results. Go ahead and laugh - I know I'm a huge dork.
Steps:
1. Soak 9 pieces of wool 12 inches long in warm water (with a couple of tablespoons of white vinegar)
2. Mix all 9 colors: Mix 1/4 teaspoon (or 1 ml) of Drink Aid to 2 Tablespoons ( or 30 ml) of water. So, that's a 1/30 Drink Aid mixture. All using the same containers (small drink glasses)
3. Add wool to each container
4. Begin microwaving to get wool to soak in color. Here's the tricky part. For larger batches, you can microwave your wool for longer, but because I have so little water, it began to boil very quickly. So, I microwaved each for 30 seconds, then 15 second intervals until done. You will know it's done when the water is milky white (with sugar I'm assuming). See photo (glass on right is done, glass on left is not)

WARNING: microwaves do produce explosive boiling water - this is not a hoax. (see link) however, with wool and all this color in it, it should not be a problem. Regardless - be very careful! The glasses and the water can get very hot, plus you don't want your wool to felt, so take your time.
5. Next, I rinsed each peice of wool with cool water (being careful not to agitate the wool) and blotted dry in a towel, then set out to air dry.
Here is a chart indicating the control number, Drink Aid Flavor, and Total Microwave time
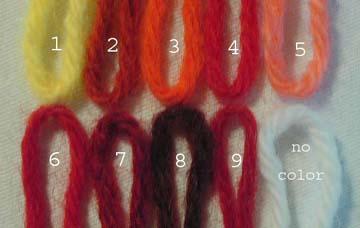
Here are the resulting colors:
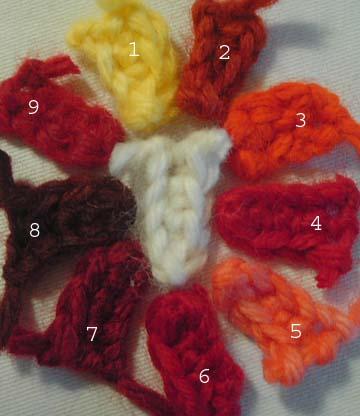
And now with the sample crocheted up into tiny blocks (this seems to represent the color better):
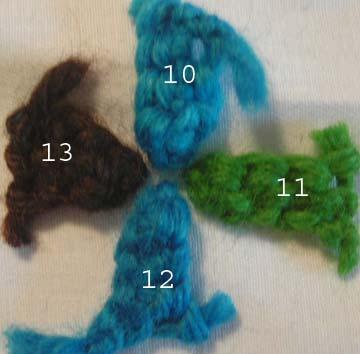
** I did a second batch with some additional colors.

Steps:
1. Soak 9 pieces of wool 12 inches long in warm water (with a couple of tablespoons of white vinegar)
2. Mix all 9 colors: Mix 1/4 teaspoon (or 1 ml) of Drink Aid to 2 Tablespoons ( or 30 ml) of water. So, that's a 1/30 Drink Aid mixture. All using the same containers (small drink glasses)
3. Add wool to each container
4. Begin microwaving to get wool to soak in color. Here's the tricky part. For larger batches, you can microwave your wool for longer, but because I have so little water, it began to boil very quickly. So, I microwaved each for 30 seconds, then 15 second intervals until done. You will know it's done when the water is milky white (with sugar I'm assuming). See photo (glass on right is done, glass on left is not)
WARNING: microwaves do produce explosive boiling water - this is not a hoax. (see link) however, with wool and all this color in it, it should not be a problem. Regardless - be very careful! The glasses and the water can get very hot, plus you don't want your wool to felt, so take your time.
5. Next, I rinsed each peice of wool with cool water (being careful not to agitate the wool) and blotted dry in a towel, then set out to air dry.
Here is a chart indicating the control number, Drink Aid Flavor, and Total Microwave time
| # | Flavor | Time (seconds) |
| 1 | Lemon | 60 |
| 2 | Peach | 90 |
| 3 | Orange | 135 |
| 4 | Strawberry | 150 |
| 5 | Pink Lemon | 45 |
| 6 | Fruit Punch | 135 |
| 7 | Raspberry | 150 |
| 8 | Black Cherry | 150 |
| 9 | Tropical Punch | 150 |
| 10 | Raspberry Reaction (Kool-Aid) | 90 |
| 11 | Wild Watermelon Kiwi (Kool-Aid) | 120 |
| 12 | Berry Blue (Kool-Aid) | 120 |
| 13 | Grape | 150 |
Here are the resulting colors:
And now with the sample crocheted up into tiny blocks (this seems to represent the color better):
** I did a second batch with some additional colors.
Tuesday, March 22, 2005
Techno Cozy
I wanted a small bag that I could carry my mp3 player, the phone, etc around the house without having to attach it to my belt, or carry it, so this is what I came up with. The yarn was given to me from my friend Ingrid (also the person who taught me to knit - thank you Ingrid!), I dyed the yarn using food coloring. Check out this link to see more information than you could ever need about dyeing yarn using Kool Aid - of course, I couldn't just follow the directions - I had to use food coloring.
Pattern was a smiple 6 stitch cable (one front / left leaning and one back / right leaning). I just sewed up the sides and made a strap using a Clover Wonder Knitter that I picked up from AC Moore.

Pattern was a smiple 6 stitch cable (one front / left leaning and one back / right leaning). I just sewed up the sides and made a strap using a Clover Wonder Knitter that I picked up from AC Moore.
Classic Cloche
This is from Knit One, Felt Two - Pattern is Classic Cloche, Adult Large, with Lamps Pride, worsted weight, in Black. I have added blocking / felting information at the end.
Pre-felting

Post-felting (on the same table with the same rulers for size reference)


Felting Info:
I used basic felting instructions and a zippered pillow case from my dear friend Sue. I pulled the hat out of the wash after two full cycles (note that I made another hat for a friend, using Paton's Classic Merino Wool and it only took a little more than one cycle of 16 minutes - so, check the hat periodically).
Here's a picture of what the hat looked like when I took it out. My hand is for size reference:

Next, I used a 1.5 Qt mixing bowl to shape the hat - the bowl helps to make sure the hat will be consistently round and smooth all the way around. As you may or may not be able to tell from the picture, the bowl is about 7 inches in diameter.

I put the hat on the bowl and rolled up the edges. I did have to do a bit of pulling on the edge to get it to stretch out a bit. Otherwise it will just go straight down (hey - this may be what you want, but I want mine to flare out a bit):

Next, I left the hat on the bowl until it was dry enough to hold it's shape (a few hours). Then I put the hat on top of a heating vent and let it dry completely. You will want to put the hat on something where it can get some air under it - you can even use a cooling rack, or a rack from your oven. This will help it dry faster and more evenly.
If your hat should happen to end up too small, you can throw it in the sink, rinse it down with some warm/hot water and stretch it out. This may involve putting the hat on your head - so be prepared to ruin any hairstyling you've done. If the hat is too big, you can simply throw it back into the washing machine and let it felt some more. Be sure to check any felting project every minute or so to prevent over felting. Once those items start to felt, the generally do so very quickly.
Pre-felting
Post-felting (on the same table with the same rulers for size reference)
Felting Info:
I used basic felting instructions and a zippered pillow case from my dear friend Sue. I pulled the hat out of the wash after two full cycles (note that I made another hat for a friend, using Paton's Classic Merino Wool and it only took a little more than one cycle of 16 minutes - so, check the hat periodically).
Here's a picture of what the hat looked like when I took it out. My hand is for size reference:
Next, I used a 1.5 Qt mixing bowl to shape the hat - the bowl helps to make sure the hat will be consistently round and smooth all the way around. As you may or may not be able to tell from the picture, the bowl is about 7 inches in diameter.
I put the hat on the bowl and rolled up the edges. I did have to do a bit of pulling on the edge to get it to stretch out a bit. Otherwise it will just go straight down (hey - this may be what you want, but I want mine to flare out a bit):
Next, I left the hat on the bowl until it was dry enough to hold it's shape (a few hours). Then I put the hat on top of a heating vent and let it dry completely. You will want to put the hat on something where it can get some air under it - you can even use a cooling rack, or a rack from your oven. This will help it dry faster and more evenly.
If your hat should happen to end up too small, you can throw it in the sink, rinse it down with some warm/hot water and stretch it out. This may involve putting the hat on your head - so be prepared to ruin any hairstyling you've done. If the hat is too big, you can simply throw it back into the washing machine and let it felt some more. Be sure to check any felting project every minute or so to prevent over felting. Once those items start to felt, the generally do so very quickly.
Subscribe to:
Comments (Atom)